


Btc e bot software free
41 comments
Terracoin cpu mining litecoin
Driven by my curiousity, I was wondering if it would be possible to run a full IOTA node on a rasberry pi. I did some more research and found out that there are 4GB ARM devices out there that might do the trick.
I chose to buy the Rock It had promissing specs, and was cheap as well. So, my goal was set: This tutorial is based on a tutorial written by yillkid.
I had to change a lot of things in order to make it work for Rock64, but all credits go to him for the initial setup. Please donate to him if you like this tutorial. Note before I start: Sometimes you will find that you are missing packages. This is very simple. All you have to type is:. Most of the time this is equil to the command.
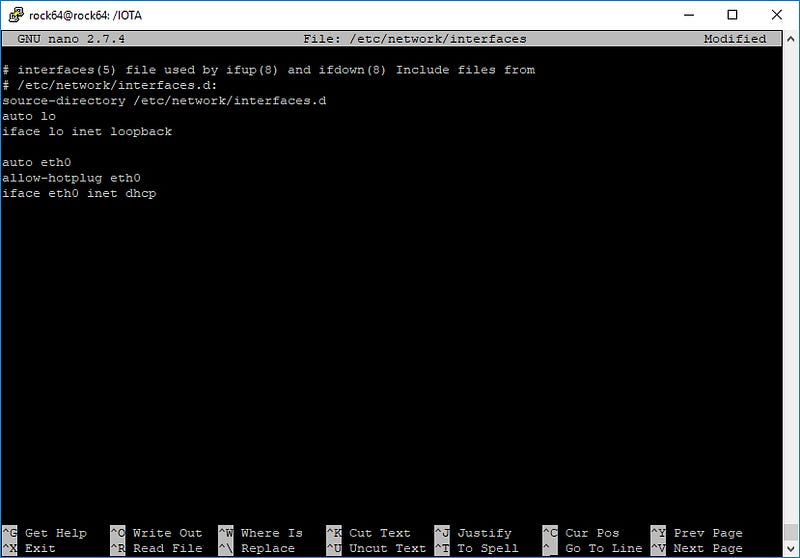
I ended up using a minimal version of Debian. In order to make sure we always use the same IP address, we should use a static ip address. But first, we want the device to obtain an unused local ip address. Add a nameserver to the resolv. Now that you have your network setup, you have the option to connect to your Rock64 with SSH. This is some sort of remote desktop. If you want to use SSH, follow these steps. I used software called PuTTY for my windows machine.
To setup SSH, follow this tutorial. To do this, I used a tutorial from pine Follow this tutorial on Pin Some things have slightly changed since this tutorial, so if something is a little bit different like not being able to choose primairy or extended partition, and partition sda5 might be called sda2 for you. You can remove the SD card from your Rock64 and read the extlinux. Alter the root label to what it was before: It might be that it boots again. If not, something went wrong with the fstab file.
This is very tricky to fix. I ended up restarting from scratch. Check if your root is indeed changed, if not, retry. It took me a while before I rodid everything correct. Boot will still be done by the SD card. This will take some time. At the moment of writing this beast is 9—10 GB in size. PuTTY can open multiple sessions with 1 server. It will now start downloading the database. In the mean time you can continue with the section: Sometimes, there is a problem with the repositry that we just added.
Because it gets updated constantly, errors sneak in. For me it randomly worked one day, and failed the other. Unverified signatures caused me the most problems.
To bypass this, we will allow unauthenticated upgrades for once. Once the installation is complete, you can verify your Java version:. How to install java on Debian 8. How to install Node. I used IRI version 1. Add the following to the file I will cover the neighbors section later, leave it empty for now:. This section will be a little bit vague, because this needs to be done on your router. Every router is different, so you might end up finding some help on the internet.
There are plenty of tutorials on how to do port forwarding. Your udp and tcp address are used to connect to neighbors. Make sure you both use either tcp or udp.
Before we launch IRI, we need to add some neighbors. Go to the discord or slack channel of IOTA and ask for neighbors. Ask for their tcp or udp address, and give your tcp or udp address to them Again, make sure both of you use either tcp or udp. Make sure you finished downloading and unpacking the database file before you launch it.
It will take some time for the database to sync to the latest Milestone. You now have your full node running on the smallest device available to run a full node on: Especially since this was my first linux experience ever.
Thanks to everybody in the discord channel who helped me setting it up. Just wanted to say I love reading through your blog and look forward to all your posts! Keep up the superb work! All you have to type is: You might have one laying around somewhere, if not, try to find one on google. Download the Image Download and install Etcher Launch Etcher and select the downloaded file as image. Configure Network In order to make sure we always use the same IP address, we should use a static ip address.
To fix it, remove the repository. It will be added automatically again. Navigate to the folder you want to install RocksDB and Iri to. After downloading, we can unpack the database file. Once the installation is complete, you can verify your Java version: Set port forwarding This section will be a little bit vague, because this needs to be done on your router.
Make sure you add the following entrees: TCP port from your static ip address. First, lets get your public ip address: Ask for their tcp or udp address, and give your tcp or udp address to them Again, make sure both of you use either tcp or udp Now lets add those addresses in your iri.
Seperate them with space. IRI - Remote access enabled. Binding API socket to listen any interface. Usefull commands Note info: